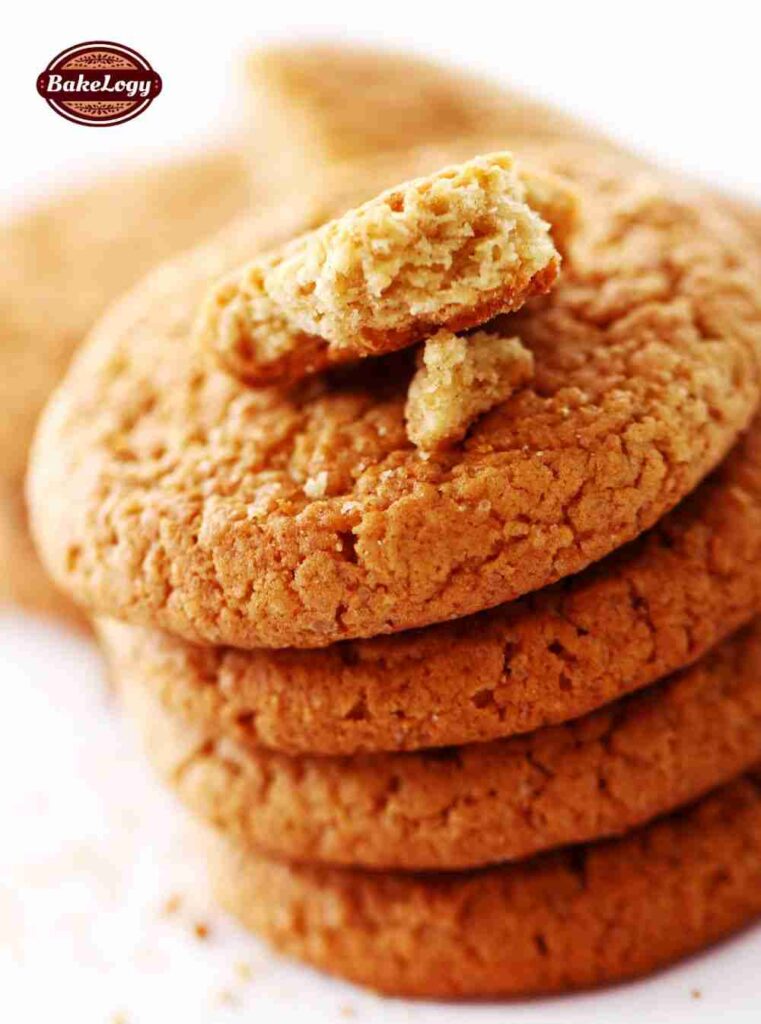
Say goodbye to store-bought! This simple, 30-minute recipe reveals the secret to buttery, melt-in-your-mouth Classic Digestive Biscuits. Made with pantry staples, these teatime favorites are easy to whip up and endlessly versatile. Enjoy them plain, dunked in your favorite brew, or jazzed up with your choice of toppings. Perfect for beginners and seasoned bakers alike, these homemade biscuits will quickly become a household favorite. Preheat your oven, grab your rolling pin, and bake a batch of nostalgic deliciousness today!
Classic Digestive Biscuits with a Twist: Variations for Every Palate
The beauty of the classic digestive biscuit lies in its simplicity, but that doesn’t mean you can’t have fun exploring different flavors and textures! Here are some ideas to jazz up your homemade batch:
Sweet Variations:
- Chocolate Chip: Add 1/2 cup chocolate chips (dark, milk, or white) to the dough for a decadent treat.
- Spiced: Warm up your biscuits with ground cinnamon, ginger, or nutmeg in the dough.
- Caramel Crunch: Drizzle melted caramel over the baked biscuits, sprinkle with sea salt, and let cool.
- Fruitful Fun: Fold in chopped dried fruits like cranberries, raisins, or apricots for a burst of sweetness and texture.
- Citrus Zing: Add the zest of an orange or lemon to the dough for a refreshing twist.
Savory Tweaks:
- Cheesy Crunch: Sprinkle grated cheddar cheese on the biscuits before baking for a salty and savory twist.
- Herbacious Delight: Mix in chopped fresh herbs like rosemary, thyme, or oregano for a savory flavor explosion.
- Spicy Kick: Add a pinch of cayenne pepper or your favorite spice blend for a little heat.
- Sesame Seed Sprinkle: Top the biscuits with sesame seeds before baking for a nutty flavor and extra crunch.
- Onion & Everything Bagel: Mix in finely chopped onion and everything bagel seasoning for a savory and addictive flavor.
Tips for Turning Variations into Reality:
- Start with the base: Follow the original recipe to make a perfect batch of classic biscuits.
- Add-ins: Fold in dry ingredients like chocolate chips, dried fruit, spices, or cheese directly into the dough.
- Toppings: Drizzle, sprinkle, or brush on flavorings like melted chocolate, caramel, herbs, or spices after baking.
- Tweak amounts: Start with small amounts of add-ins and adjust to your taste preference.
- Experiment and have fun! Don’t be afraid to mix and match different flavors and textures to create your own unique digestive biscuit masterpiece.

Tips for Perfect Classic Digestive Biscuits:
Achieving the ideal texture:
- Don’t overmix: This leads to tough biscuits. Combine ingredients until just incorporated, leaving some visible streaks of flour.
- Chill the dough: This relaxes the gluten, resulting in a crispier biscuit. Wrap in plastic and refrigerate for at least 30 minutes before rolling it.
- Roll evenly: Use a rolling pin and guides to ensure a consistent thickness (around 1/8 inch). Uneven thickness results in uneven baking.
- Don’t overbake: Watch closely towards the end, aiming for golden brown edges and a slightly firm center. Overbaking leads to dry biscuits.
Flavor and presentation:
- High-quality ingredients: Use unsalted butter, fresh milk, and good-quality flours for optimal taste.
- Vanilla extract: Add a touch of vanilla extract to enhance the overall flavor.
- Scoring: Use a fork to create shallow lines on top of the biscuits before baking for a classic look and easier dunking.
- Chocolate drizzle: Drizzle melted chocolate over cooled biscuits for a decadent treat.
- Store properly: Keep biscuits in an airtight container at room temperature for up to a week.
Bonus tips:
- Use whole wheat flour: Substitute up to half the all-purpose flour with whole wheat for a slightly healthier and nuttier flavor.
- Brushing with milk: Brush the tops of the biscuits with milk before baking for a golden brown shine.
- Sprinkles & decorations: Get creative! Add sprinkles, chopped nuts, or dried fruit to the tops for a festive touch.
- Leftovers: Crumble leftover biscuits and use them as a topping for yogurt, ice cream, or cheesecake crusts.
FAQs: Answers to Your Classic Digestive Biscuit Baking Conundrums!
My dough feels too dry! What do I do?
Don’t you worry, a little dryness is manageable! Add a tablespoon of milk at a time, mixing well after each addition, until the dough comes together without feeling sticky. Remember, it’s better to start slightly dry than overwork the dough.
My biscuits aren’t spreading enough!
This could be due to under-chilled dough. Make sure your dough has rested in the fridge for at least 30 minutes before rolling. Additionally, ensure you’re rolling the dough evenly to a consistent thickness.
My biscuits are burning on the bottom!
Check the oven temperature – ovens occasionally run hot to what is indicated on the thermostat. Decrease the temperature by 10 degrees and bake less time. Use a baking sheet lined with parchment for even heating.
My biscuits are too crumbly!
Overmixing the dough can lead to crumbly biscuits. Gently combine the ingredients just until incorporated, avoiding overworking the gluten. Additionally, ensure you’re using the correct measurements for flour and butter.
Can I substitute ingredients?
Absolutely! Here are some common substitutions:
- Whole wheat flour: Replace up to half the all-purpose flour for a healthier option.
- Brown sugar: Use brown sugar instead of powdered sugar for a richer flavor.
- Vegan butter: Replace butter with vegan butter for a dairy-free option.
- Milk: Use plant-based milk like almond milk or oat milk in place of regular milk.
How long do these biscuits keep?
Store your cooled biscuits in an airtight container at room temperature for up to a week. They also freeze well for up to 3 months!
Can I use cookie cutters?
Yes, you can! Use round cookie cutters for a classic shape, or get creative with different shapes. Just remember to adjust the baking time slightly depending on the size of your cutouts.
How can I make these biscuits more exciting?
Get creative with toppings and variations! Try adding chocolate chips, dried fruit, spices, or even a savory twist with herbs and cheese.
I’m a beginner baker, can I still make these?
Absolutely! This recipe is perfect for beginners. Follow the instructions carefully and don’t be afraid to experiment. You’ve got this!
Enjoy your delicious homemade digestive biscuits!

Classic Digestive Biscuits
Equipment
- Mixing bowl
- Measuring cups and spoons
- Rolling Pin
- Flour sifter (optional)
- Knife or pastry cutter
- Round cookie cutter (optional)
- Baking sheet
- Parchment paper
- Fork
Ingredients
- 1 1/2 cups 180g plain flour
- 1/2 cup 75g whole wheat flour
- 1/2 teaspoon baking powder
- 1/2 teaspoon salt
- 3/4 cup 85g powdered sugar
- 1/2 cup 115g unsalted butter, softened
- 2 tablespoons milk
Instructions
- Preheat oven to 180°C (350°F) and line a baking sheet with parchment paper.
- In a large bowl, whisk together the flours, baking powder, and salt. Sift if desired for a lighter texture.
- Using your fingertips or a pastry cutter, rub the softened butter into the dry ingredients until the mixture resembles coarse crumbs.
- Stir in the powdered sugar, then gradually add the milk until a soft dough forms. Don’t overmix!
- Lightly flour a surface and roll out the dough to a thickness of about 1/8 inch.
- Use a round cookie cutter (or a sharp knife) to cut out desired shapes. Re-roll scraps as needed.
- Prick each biscuit lightly with a fork.
- Arrange biscuits on the prepared baking sheet, leaving some space between them.
- Bake for 15-20 minutes, or until golden brown and firm.
- Let cool on the baking sheet for a few minutes before transferring to a wire rack to cool completely.